Quick-Start Guide
This page skips over some details to get a new user uploading trajectories to the staging environment in 15 minutes.
Onboarding
After contacting space-safety-onboarding@spacex.com, you will receive an email instructing you to set up a passkey for access to staging.space-safety.starlink.com.
The first person who logs in must sign our Terms of Service to get access to this system. Part of agreeing to those terms is certifying that you are authorized to sign that agreement on behalf of your organization (or, that a colleague with that authority already has).
Staging vs. Production
We host two versions of the Space Safety Platform, a staging environment (at staging.space-safety.starlink.com) and a production environment (hosted at space-safety.starlink.com). Both of these have the fully functional web-based user interface (UI) and API.
The staging environment allows operators to test out the system (both the web-based UI, and API integrations) without interfering with on-orbit operations of other users.
The production environment is used for conjunction assessment by other operators. Complete this quick-start guide in the staging environment before moving to production.
In the web UI, a yellow banner indicates when you are using the staging environment:

The Operator Details Page
After agreeing to the terms and conditions, the first page that you will be presented with is the operator details page for your organization:
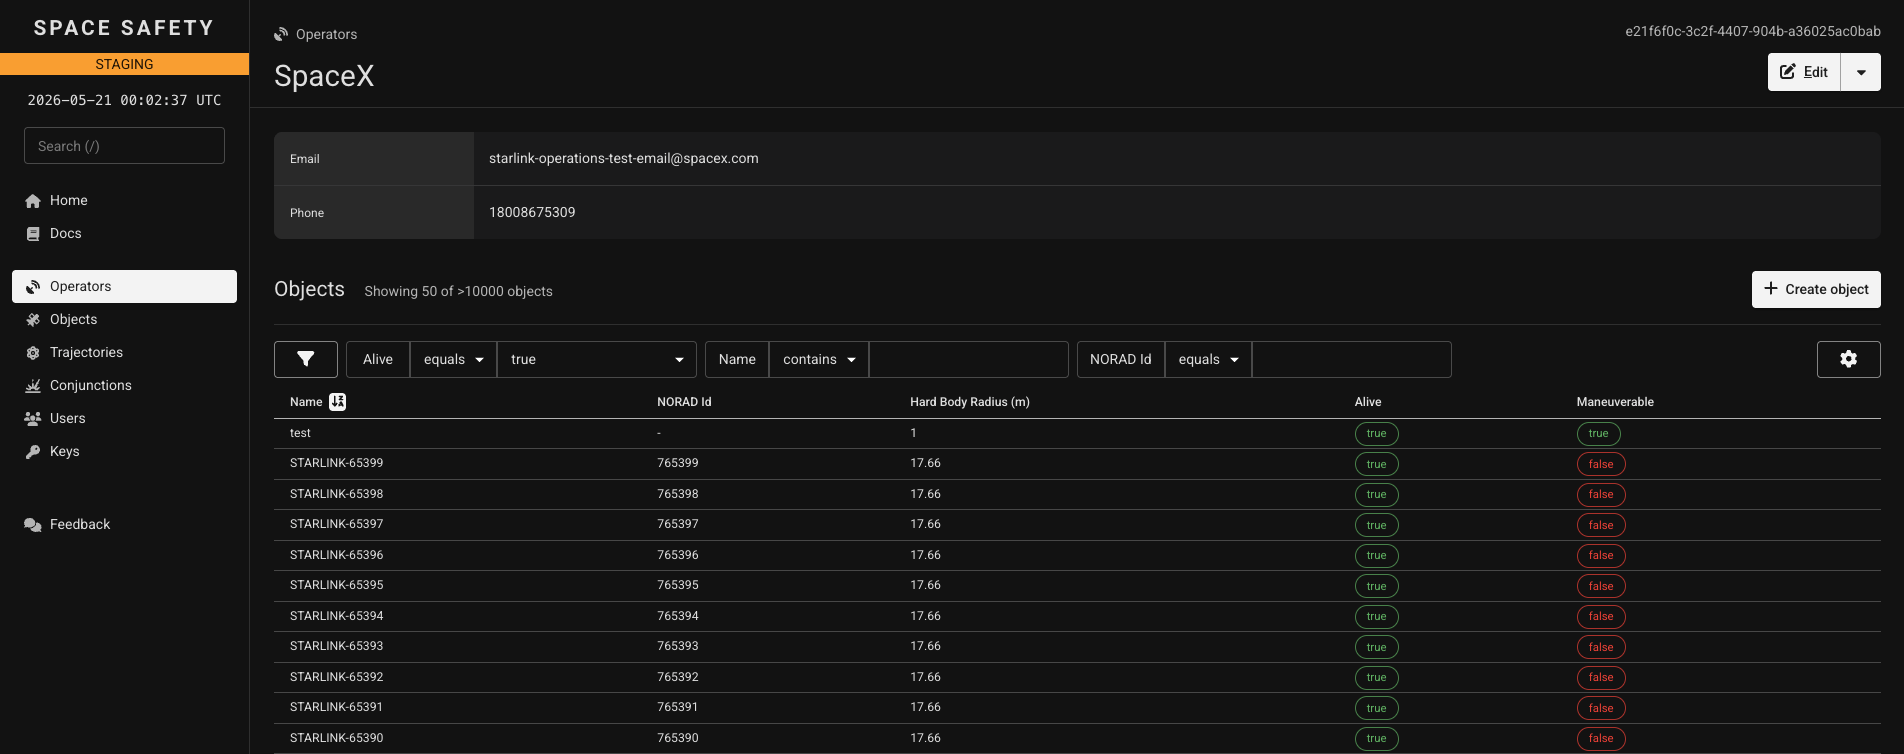
The top of the page displays information about your organization that is shared with other users of the platform. You can use the "Edit" button in the upper right corner to edit your operator details. We recommend that you include an email and a phone number so that other operators can contact you for conjunction coordination.
Below your operator details is a list of objects (satellites) associated with your account. If you already operate a satellite in orbit, it may already be listed here (and if it isn't there may be an existing object we can associate with your account).
Below the objects table, there is a list of upcoming conjunctions involving your satellites. Below that is a list of users and API keys associated with your account.
If you are the first user for your organization, you can add additional users for your organization using the "Create User" button. We set a limit for the number of users that can be added for a given organization. API keys will be discussed later in this guide.

You can learn more about Operators, Users, and API keys in our detailed documentation.
Creating an Object
You can use the "Create Object" button on the operator details page to create a new object associated with your operator:

This will open up a form to input information about your object:
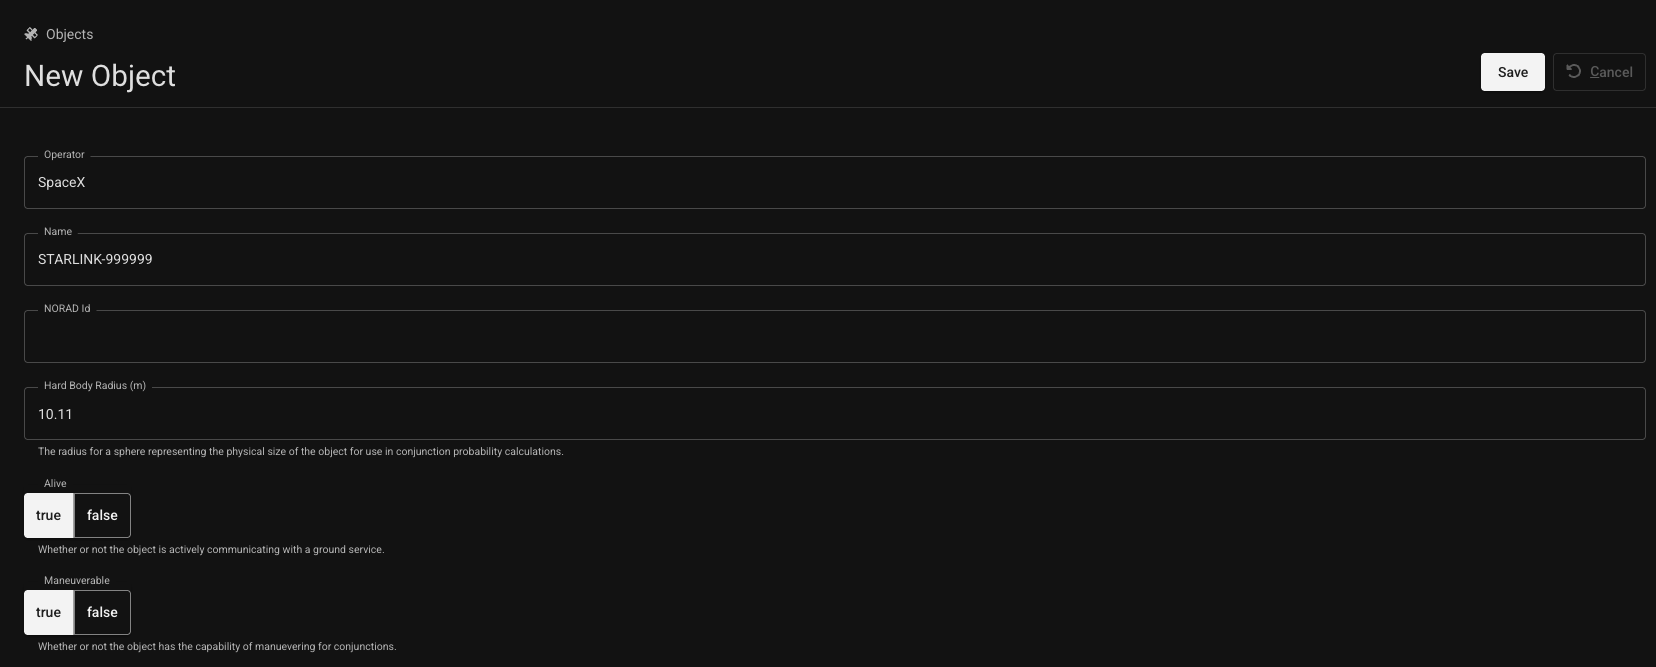
Once you create the object, it should now be visible on the table in the operator details page.
You can learn more about Objects in our detailed documentation.
Uploading a Trajectory
After creating an object (or after clicking on an object from the operator details page) you will be directed to the object details page:
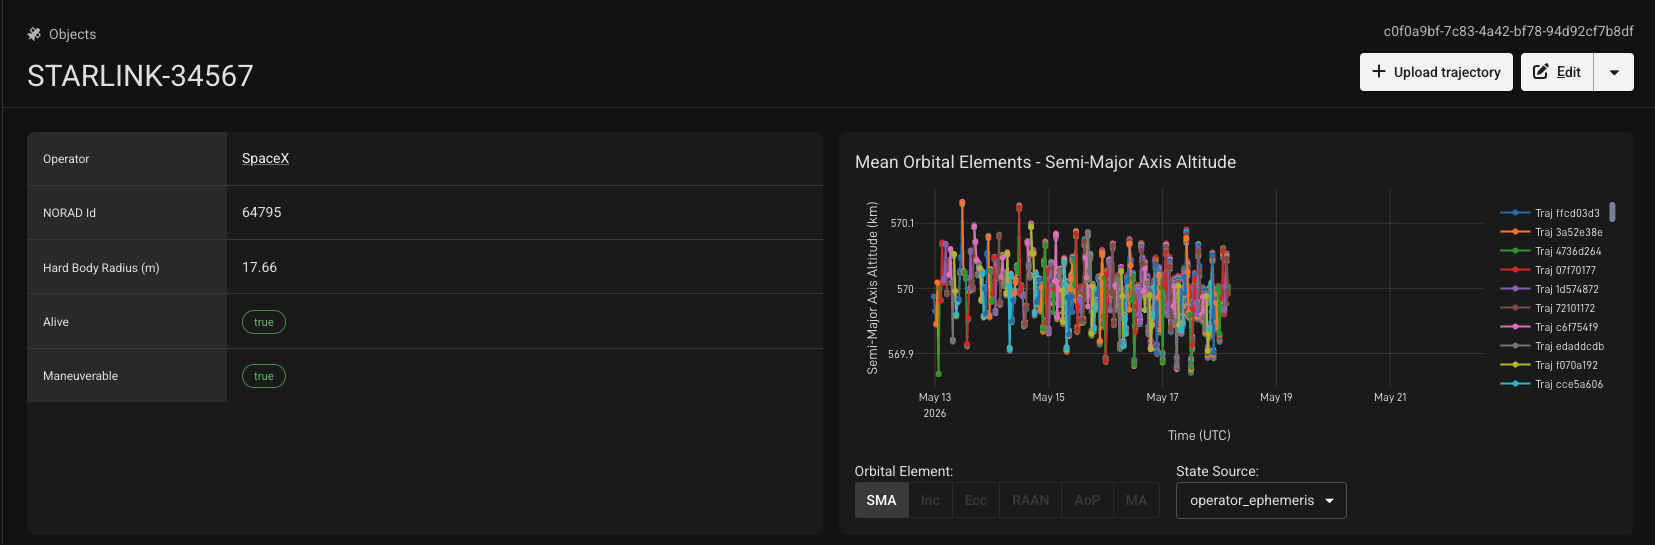
If the object is newly-created, many of these panels will be blank, because you have not yet submitted a trajectory for that object.
You can upload a trajectory by clicking the "Upload Trajectory" button in the top-right corner of the object details page:
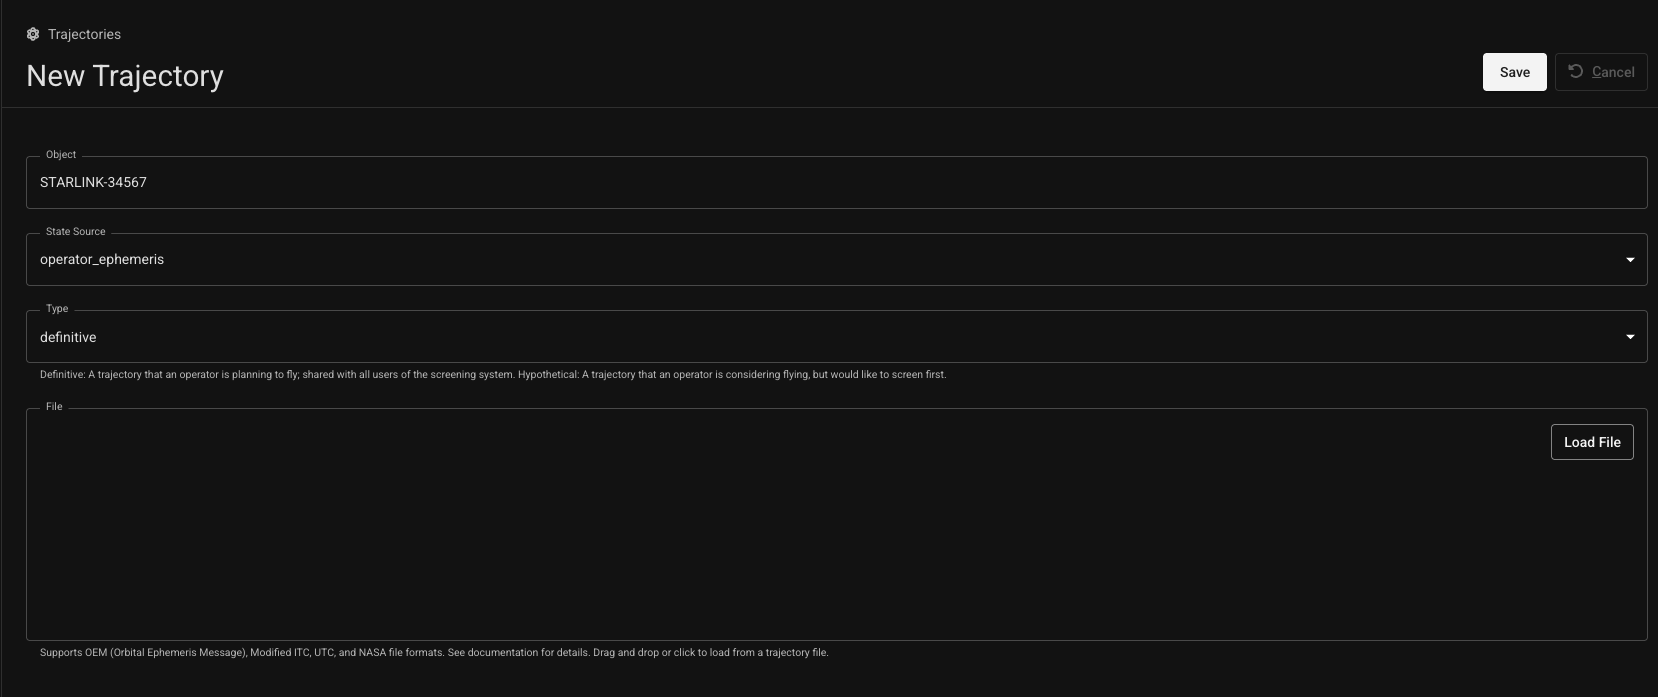
The "Type" may be either "definitive" or "hypothetical". A "definitive" trajectory represent the trajectory your spacecraft intends to fly (including planned maneuvers). The "hypothetical" submission type allows operators to submit ephemerides for maneuver planning or analysis purposes without overwriting your most recent definitive submission. You can learn more about trajectory types in our detailed documentation.
"definitive" trajectories submitted to the production environment will be used by other operators for conjunction assessment. If you are testing, make sure you are using the staging environment (staging.space-safety.starlink.com).
Below is a sample OEM file in the proper format. Modify the object name to match your newly-created object, and the timestamps to be in the future:
Sample OEM File
CCSDS_OEM_VERS = 3.0
CREATION_DATE = 2023-11-06T02:08:15.481374Z
ORIGINATOR = SPACEX/USA

META_START
OBJECT_NAME = STARLINK-3179
OBJECT_ID = 31790
CENTER_NAME = EARTH
REF_FRAME = ITRF
TIME_SYSTEM = UTC
START_TIME = 2023-11-06T02:09:42.000000Z
STOP_TIME = 2023-11-06T02:15:42.000000Z
META_STOP

2023-11-06T02:09:42.000000Z -4.542752e+03 -3.316417e+03 3.877276e+03 4.819418e+00 9.779460e-02 5.717377e+00
2023-11-06T02:10:42.000000Z -4.243593e+03 -3.304426e+03 4.211322e+03 5.149116e+00 3.012760e-01 5.413318e+00
2023-11-06T02:11:42.000000Z -3.925285e+03 -3.280348e+03 4.526387e+03 5.457463e+00 5.005622e-01 5.084935e+00
2023-11-06T02:12:42.000000Z -3.589152e+03 -3.244456e+03 4.821057e+03 5.743052e+00 6.949538e-01 4.733722e+00
2023-11-06T02:13:42.000000Z -3.236600e+03 -3.197065e+03 5.094009e+03 6.004573e+00 8.837872e-01 4.361276e+00
2023-11-06T02:14:42.000000Z -2.869109e+03 -3.138526e+03 5.344019e+03 6.240812e+00 1.066436e+00 3.969275e+00
2023-11-06T02:15:42.000000Z -2.488230e+03 -3.069228e+03 5.569967e+03 6.450669e+00 1.242312e+00 3.559489e+00


COVARIANCE_START
EPOCH = 2023-11-06T02:09:42.000000Z
COV_REF_FRAME = RTN
1.000000e+00
0.000000e+00 1.000000e+02
0.000000e+00 0.000000e+00 6.400000e-01
0.000000e+00 0.000000e+00 0.000000e+00 1.000000e-08
0.000000e+00 0.000000e+00 0.000000e+00 0.000000e+00 1.000000e-08
0.000000e+00 0.000000e+00 0.000000e+00 0.000000e+00 0.000000e+00 1.000000e-08
EPOCH = 2023-11-06T02:10:42.000000Z
COV_REF_FRAME = RTN
1.000000e+00
0.000000e+00 1.000000e+02
0.000000e+00 0.000000e+00 6.400000e-01
0.000000e+00 0.000000e+00 0.000000e+00 1.000000e-08
0.000000e+00 0.000000e+00 0.000000e+00 0.000000e+00 1.000000e-08
0.000000e+00 0.000000e+00 0.000000e+00 0.000000e+00 0.000000e+00 1.000000e-08
EPOCH = 2023-11-06T02:11:42.000000Z
COV_REF_FRAME = RTN
1.000000e+00
0.000000e+00 1.000000e+02
0.000000e+00 0.000000e+00 6.400000e-01
0.000000e+00 0.000000e+00 0.000000e+00 1.000000e-08
0.000000e+00 0.000000e+00 0.000000e+00 0.000000e+00 1.000000e-08
0.000000e+00 0.000000e+00 0.000000e+00 0.000000e+00 0.000000e+00 1.000000e-08
EPOCH = 2023-11-06T02:12:42.000000Z
COV_REF_FRAME = RTN
1.000000e+00
0.000000e+00 1.000000e+02
0.000000e+00 0.000000e+00 6.400000e-01
0.000000e+00 0.000000e+00 0.000000e+00 1.000000e-08
0.000000e+00 0.000000e+00 0.000000e+00 0.000000e+00 1.000000e-08
0.000000e+00 0.000000e+00 0.000000e+00 0.000000e+00 0.000000e+00 1.000000e-08
EPOCH = 2023-11-06T02:13:42.000000Z
COV_REF_FRAME = RTN
1.000000e+00
0.000000e+00 1.000000e+02
0.000000e+00 0.000000e+00 6.400000e-01
0.000000e+00 0.000000e+00 0.000000e+00 1.000000e-08
0.000000e+00 0.000000e+00 0.000000e+00 0.000000e+00 1.000000e-08
0.000000e+00 0.000000e+00 0.000000e+00 0.000000e+00 0.000000e+00 1.000000e-08
EPOCH = 2023-11-06T02:14:42.000000Z
COV_REF_FRAME = RTN
1.000000e+00
0.000000e+00 1.000000e+02
0.000000e+00 0.000000e+00 6.400000e-01
0.000000e+00 0.000000e+00 0.000000e+00 1.000000e-08
0.000000e+00 0.000000e+00 0.000000e+00 0.000000e+00 1.000000e-08
0.000000e+00 0.000000e+00 0.000000e+00 0.000000e+00 0.000000e+00 1.000000e-08
EPOCH = 2023-11-06T02:15:42.000000Z
COV_REF_FRAME = RTN
1.000000e+00
0.000000e+00 1.000000e+02
0.000000e+00 0.000000e+00 6.400000e-01
0.000000e+00 0.000000e+00 0.000000e+00 1.000000e-08
0.000000e+00 0.000000e+00 0.000000e+00 0.000000e+00 1.000000e-08
0.000000e+00 0.000000e+00 0.000000e+00 0.000000e+00 0.000000e+00 1.000000e-08
COVARIANCE_STOP
Once you submit a trajectory, you should be able to inspect its properties via the trajectory details page, and start to see some of the plots on the object details page get populated.
You should also see whether it is screened or not. Unscreened trajectories will show a "Screened Status" of not_screened and have a warning banner:
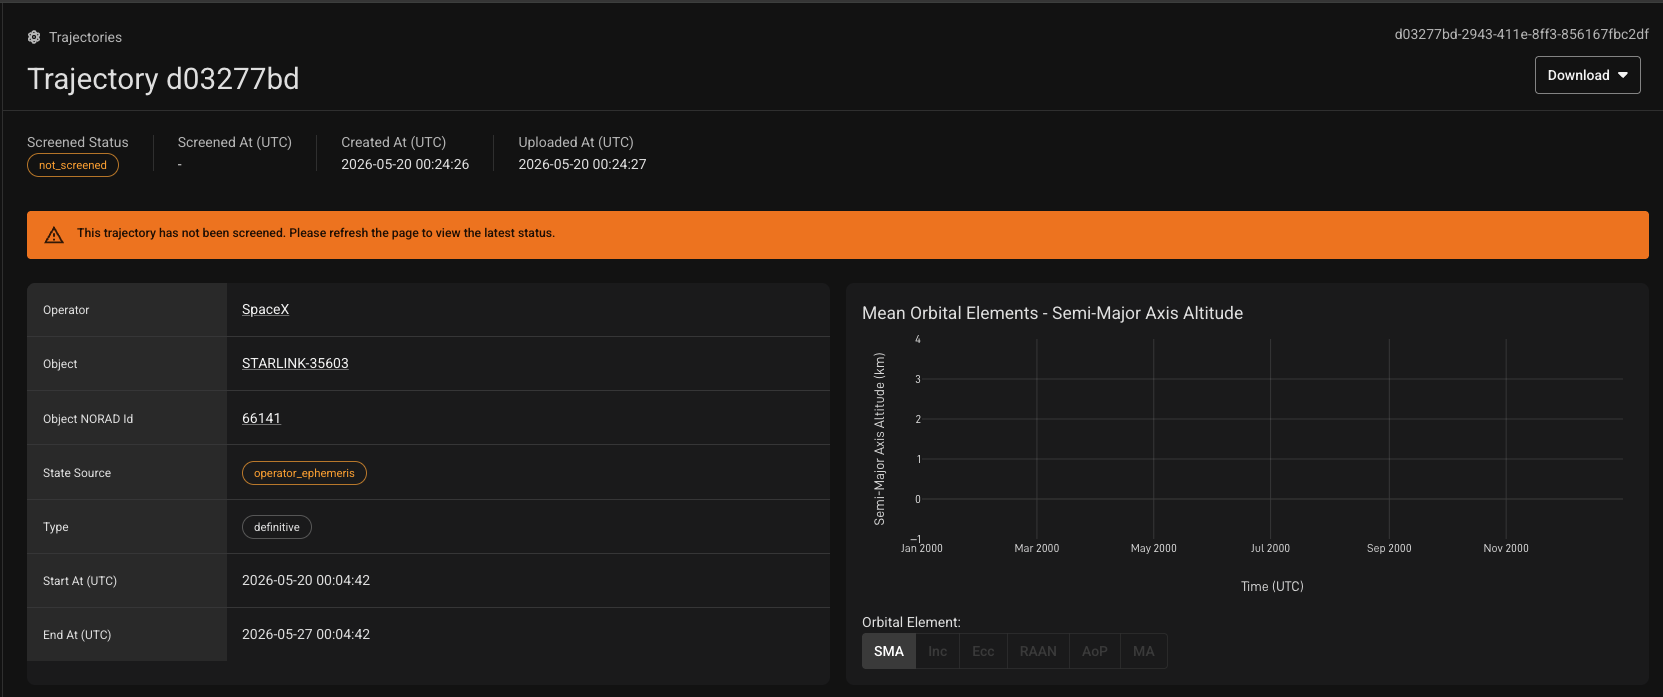
After the trajectory is screened (typically in < 1 minute) you will see the state source change, the banner will be removed, and any Conjunction Data Messages (CDMs) associated with the trajectory will appear.
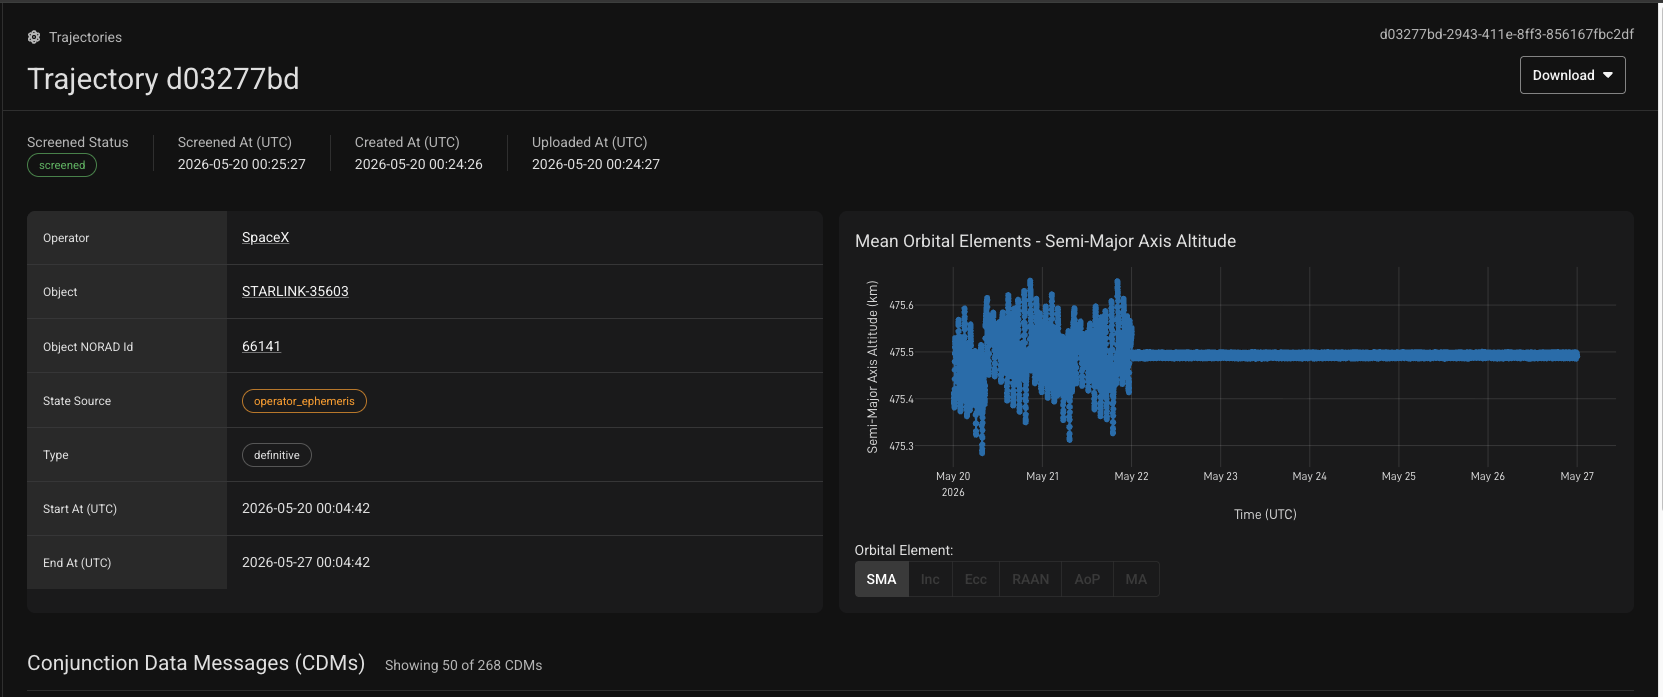
You can learn more about trajectories, trajectory types, state sources, and the various reference frames and file formats we support in our detailed documentation.
API Keys
Using the web-based UI is helpful for manual analysis and exploration of data. However, we encourage all operators to set up automated systems to publish their ephemeris and monitor conjunction data.
Follow the instructions in the API keys documentation, or in your original onboarding email, to set up API keys.
The API Patterns page provides examples of how to use the API to automate these workflows.